
I have been thinking of building a brick oven for many years as it combines three of my favourite things, cooking, eating and making things. I have been cooking outdoors on barbecues at home and on camping trips with the family and own an ozpig which for those of you in the know is a small woodburning stove that is made from a gas cylinder in Australia and looks a little like a pig (hence the name) which has been great for cooking with family and friends whilst outdoors and also providing well needed heat during the hazy red wine fuelled evenings.
I have also been lucky enough through different work to cook on an old Coleman dual fuel double burner stove whilst supporting expeditions to the Magnetic north pole on three seperate six week camping trips and have also instructed groups on how to skin and cook rabbits over an open fire along with cooking in cast iron Dutch ovens and cooking lamb underground with stones heated in the fire. So I guess a brick oven would be the next step.
So over the last few years I have been researching the build on the net and by buying several books on the subject but the oven still remained an unstarted project that I kept going back to and thought about every now and then.
This all changed last year (May 2012) which was an eventful one for me and my family when in the space of about a month the following happened: We moved house , My second child Elsie was born, I was made redundant and my Dad died.
Out of all these the only real surprise was Dad dying, the House move had been touch and go at times but finally happened, I definitely new about the pregnancy and work had been rubbish for a while and to be honest I was glad when I got the boot. Dad had been Ill for a few years with Lymphoma and had been on Chemo on and off and although we knew it wasn't going away we thought that he would be with us for a while, in the end he died quite quickly and it was tough for all of us. I don't want to dwell on this event but he was an amazing Dad and I miss him being around.
Anyway back to the oven. Once things had started to get back to normal (ish) Mum informed me that Dads savings were being shared between me and my sister, and although not a huge amount
I thought that I could buy something to remember him by. I spoke to my wife about what to buy and not being a dressy sort of person we dismissed the usual watches and Jewellery (It took me three years to tell my wife I had lost my wedding ring!) and in the end I settled on buying a new camera and to finally start building my oven.
So I dedicate this build to the memory of my Dad, John Tully
The Build
The build has taken place over about 20 separate days starting in October 2012 right through to March 2013 some days being longer than others and all had to fit in around work and family commitments plus the British winter weather and short daylight hours. I will do my best to keep things interesting but also want to keep true to each stage of the build, the pitfalls I experienced and anything useful I have learnt on the way this will include materials used, where I sourced them and will try and reference any websites or publications that have helped my decision making on the build, hopefully this can be of help to those considering building an outdoor oven and also give a good insight into how I built mine!
Apart from a few basic measurements no formal plans were used but I had a good idea of what I wanted the oven to look like although the organic build shaped a lot of decisions along the way.
The Site

As you can see from this photo there is an existing brick wall and patio area at the back of the house. The plan is to build the oven using the existing wall as part of the base and matching the bricks and slabs into the design, the previous owners had left some spare slabs so I just had to match the bricks, a quick call to the Matching brick company http://www.matchingbrick.co.uk/ in Bristol was made and they suggested taking a photo of the existing brickwork and they could match from this, After a trip down I was duly told that the bricks were called Pastorales and were in stock so I duly ordered my bricks, concrete blocks, thermalite blocks and firebricks for the oven hearth from them which were promptly and efficiently delivered. having researched prices they all seemed good although later I learnt that I could of got the firebricks cheaper from another Bristol Company called Vitcas http://www.vitcas.com/ But more on this company later.The pop up gazebo shown was essential to the build which was in all weathers and stayed up throughout the six month build time it was solidly pegged and guyed and stood up the strongest winds, I would highly recommend one if you are planning an oven build, especially in winter.
The foundation and blockwork base


The foundation was dug to a depth of about 200mm and filled with 75mm of gravel which was tamped down, On top of this I poured a concrete slab of about 125mm reinforced with rebar mesh.
The dug foundation was about 1450mm by 1350mm which along with the existing wall made for a base of about 1450mm by 1700mm which should be enough for my planned 1100mm internal diameter oven. (calculated with help from 'Your Brick Oven' by Russell Jeavons).
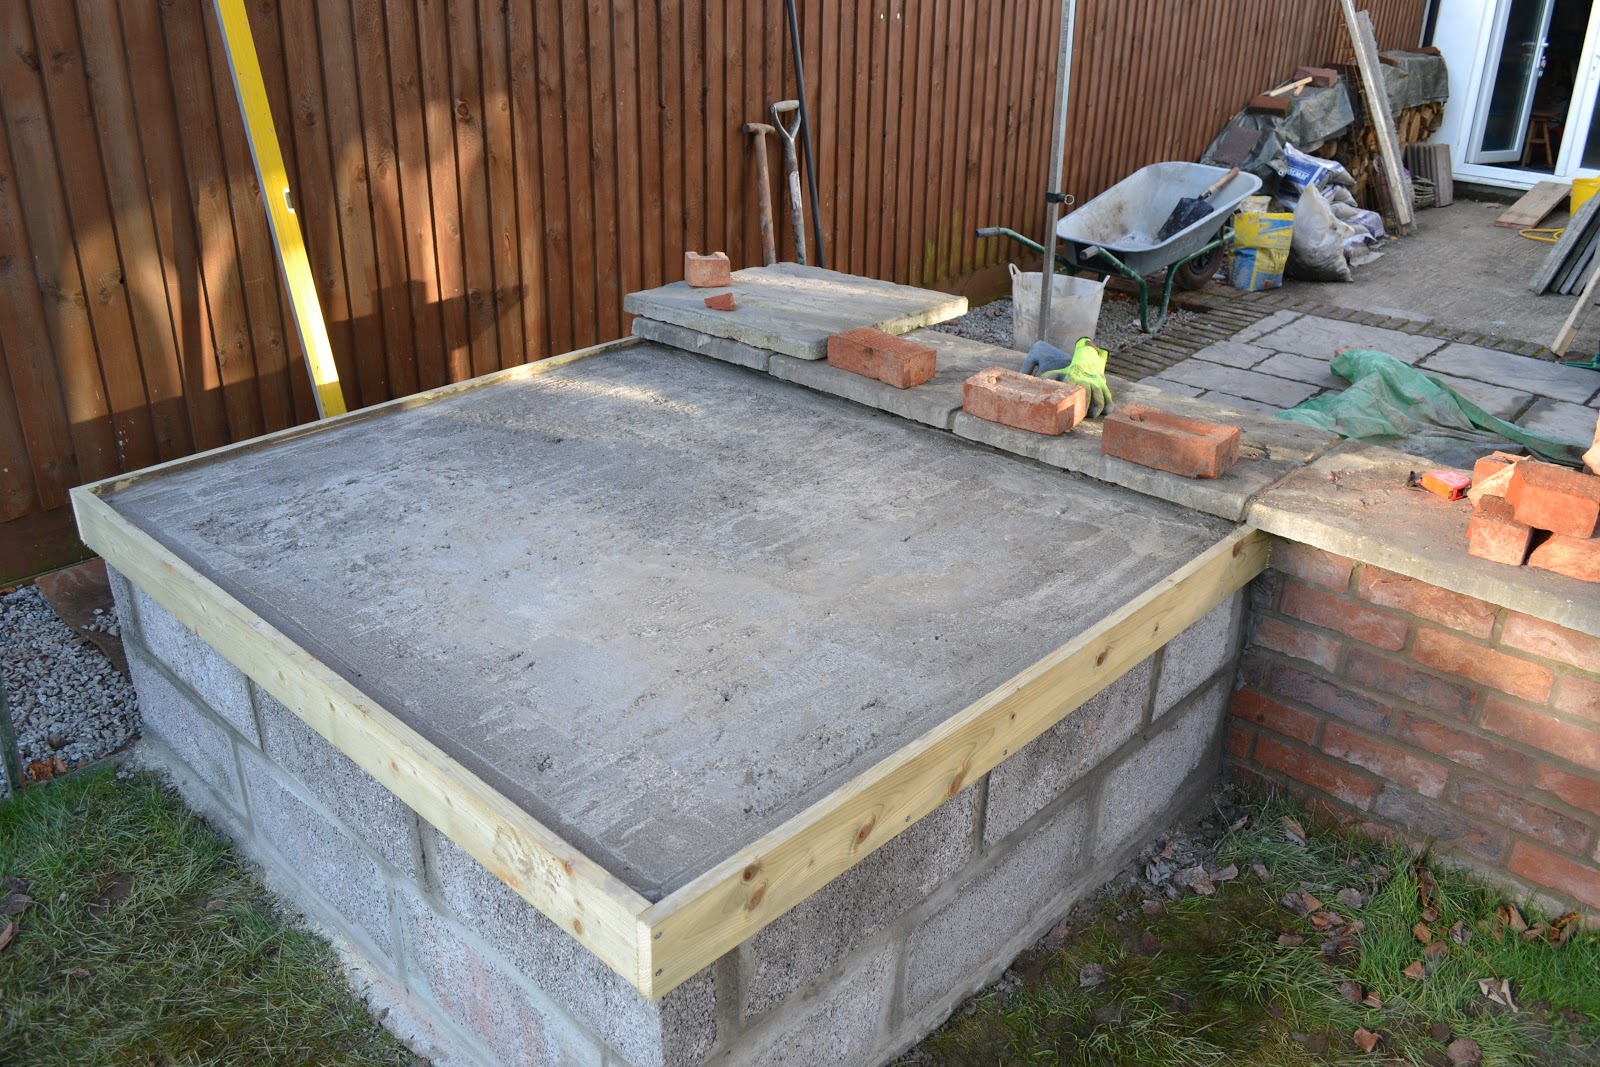
Two courses of concrete blocks were then laid on top of the slab and then what you can't see from the photos an old pallet was propped up on blocks in the middle of the block work and some old sheet ply cut to size and rested on top of this about 100mm below the top of the blocks formed the base for the next concrete slab (gaffer tape was used to seal the edges).
Another rebar mesh sheet was cut to fit just on top of the blocks and wooden formers were made to form a lip up to the level of the existing slabs
150mm of concrete was then poured and levelled with a trowel 15mm below the top of the lip

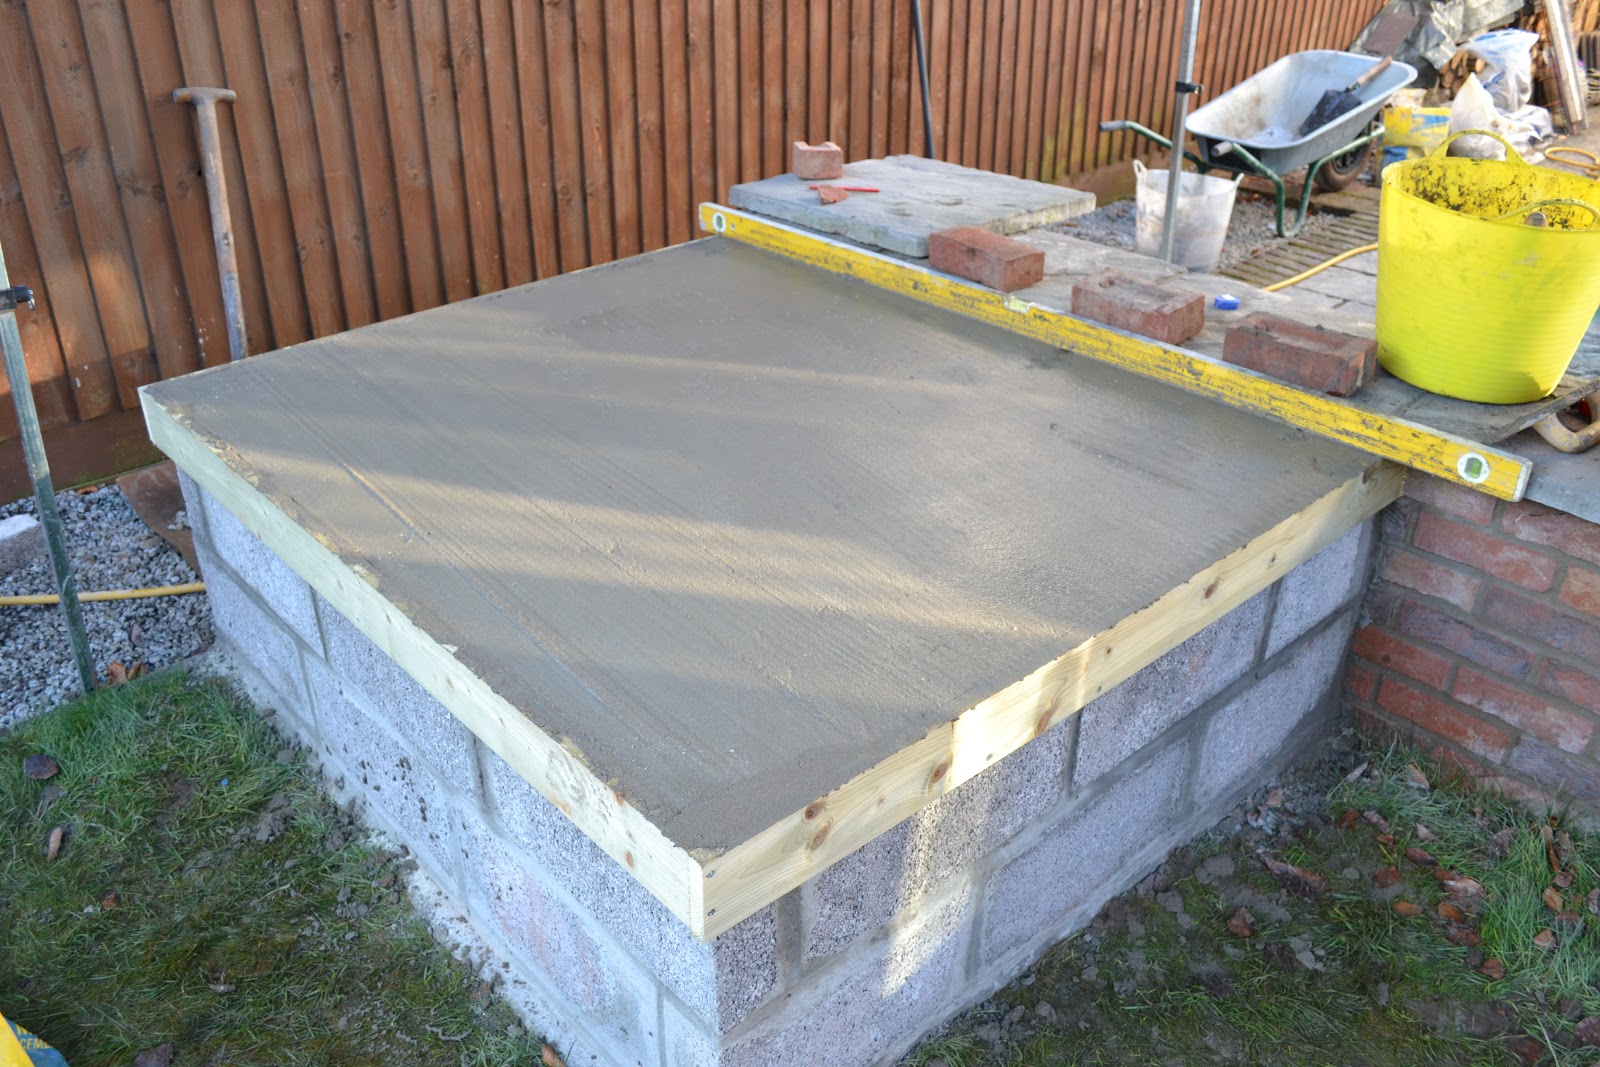


A 4:1 sand cement mortar was mixed in situ and the slabs were cut to size and placed directly on this mix, the gaps were pointed and the wood removed leaving the top of the base level with the top of the existing wall. That is the base complete.
Underfloor insulation
The next stage is to insulate under the oven floor and build up the brickwork so that the working height of the oven floor is suitable. Research says that the oven floor should be a workable height for its user and that you shouldn't have to bend down to see into the back of the oven through the door. I calculated about a metre should be about right for me and this worked out about three brick courses which was fine as I wasn't 100% confident of my bricklaying skills. In the end the floor was 94cm which works fine and I have learnt not to get to het up about exact measurements as other factors influence these things and winging it is half the challenge and fun.


These four photos show the process of laying a level bed of mortar using wood again to determine the area and the laying of the thermalite blocks to provide insulation under the oven. Again research gives many different recommendations, perlite mixed with cement, empty glass bottles and the such like but to me thermalite blocks seemed the easiest and cheapest solution and seem to have worked fine. (I used three standard concrete blocks at the front as I ran out of thermalites).
As you can see I had a keen and able labourer in the shape of my son, Wilf. Photo 4 shows the result of a hard days work on a three year old!
The Brickwork


The brickwork is the bit I had been looking forward to and dreading at the same time, I had laid a few patios in my time and done a bit of dry stone walling but not a great deal of bricklaying, the block base was a good way to practice mixing the mortar and as it would eventually be rendered it wouldn't matter if it looked a little rough. The whole look of the oven would be determined by the brickwork and I wanted to get it right.
The photos show the first three courses being built and the finished pointed product. I was trying to match the existing brickwork which had a fairly wide joint and with the Pastorale bricks being fairly rustic I did not string the brickwork but mainly levelled it by eye and followed the lines of the insulating blocks. Overall I was pleased with the result and these first three courses put me in good stead for the build ahead.
Here are my top tips for Bricklaying for a total novice from a fellow novice.
- Beg, borrow or hire a mixer
- Dry mix your sand/cement at about 4:1, (2 bags sand 1/2 bag cement works in a standard mixer)
- Add plasticizer (I used febmix)
- Add water slowly and let mix, its easy to add more but hard to thicken a slurry! sand that is wet often has enough water in already.
- Mortar should be creamy yet hold its shape, you know when its right.
- Use whatever trowel suits you, you are not getting paid per brick! I found a gauging trowel suited me best and a bricklaying trowel too big
- Take you time and don't worry if the joints look a mess, scrape any mortar that has oozed out as you push the brick and leave the pointing for later
- Spend the morning bricklaying, Cut some bricks for the oven in the afternoon and point the joints last thing, use a short length of rubber hose to strike joints and dust with an old paint brush.
- If you can start laying where the brickwork won't show, use this area to practice and get it right.
The oven floor
The next stage is the start of the actual oven itself, the hearth floor, this is what the fire will sit on in the oven and all my research pretty much concluded that this needs to be built using firebricks, these are laid diagonally on a bed of weak dry mortar (I read that diagonal is best as the pizza peel, the tool that places the pizzas in the oven won't catch on any uneven edges, which made sense to me).
The mortar bed is levelled with a tiling float which leaves lots of uniform tiny grooves and each brick is held next to its neighbour and slid down into place to make sure the tops are all level and no mortar gets in between the bricks.


Once all the full firebricks had been laid, I cut some to make a neater edge The firebricks were cut with a 9 inch grinder with a diamond blade (more on cutting later!) and a decorative surround was added.
The type of slabs for the surround were determined the height between the top of the brickwork and the oven floor, I wanted the surround to sit flush so at the door of the oven there was a level shelf to slide pans and trays easily into the oven. Including a minimum 10mm mortar joint I was left with 35mm which was tight! I took a trip to Bowland stone http://www.bowlandstone.co.uk/ in Bristol where I managed to source some slate effect slabs which were the right thickness and complemented the other slabs and brickworks. These were then cut, laid and pointed.
You can also see a cardboard template of the oven interior (the door to the oven will be over the existing wall end.)
Inner oven dome
The next step is the building of the actual oven dome and arch, again plenty of research went into the size and type of dome and the shape and height of the arch door and anyone considering building an oven who wants to contact me about the merits of these choices can do so, but ultimately the dome would be hemispherical with a radius of 54cm and the height of the doorway is 34cm at its highest point. the shape of the doorway was determined by making a template using actual bricks with their edges touching and matching the curve to fit in with the circular footprint of the oven.

The resulting arch former was built from two sheets of mdf screwed either side of some 3 by 2 and 54cm brick gauge (trammel) was made using scrap timber and an old shed hinge fixed with a bolt and washer, this was then glued to the cardboard template, this system worked well and the cardboard protected the oven floor from any falling mortar.
Again my research showed two trains of thought about the bricks used in the oven dome. Most
sites recommend firebricks especially US sites as they seem to be cheap there but at around £2 a piece in the UK it would make for an expensive build with around 150 bricks cut in half for the dome (firebricks also eat diamond blades when cutting due to being so hard).
The other train of thought is to use normal clay bricks (not concrete bricks!) as these are fired in the kiln during manufacture at 1100c and are stable up to this temperature which made sense to me and my wallet!
There is a very useful website and forum called Forno Bravo http://www.fornobravo.com/ which has some great free download able PDFs all about oven building which I found invaluable and this quote comes from them
"If you plan to build your oven with clay brick or not at all, We would strongly recommend building your oven with Clay brick"
So clay brick it is!

Nearly all the bricks used in the ovens construction are half bricks (around 550 half bricks in total!), and each pair of these started life as whole bricks (I wish they sold half bricks!) so during the build I reckon I cut about 300 bricks, after trying with a bolster and hammer as recommended by some I found that it was more useful to have uniform half bricks to make the build easier so I made a holder out of an old scaffold plank with a batten down the side and one end where I could stack up to ten bricks and mark the exact centre and then cut with a nine inch diamond blade. This gave better results but at the expense of a couple of blades and a lot of red dust! I tried soaking the bricks in water but it made no difference and in the end spent half a day cutting bricks and another half a day cleaning up the back garden. Not the most enjoyable day but a necessary evil.


This shows the outside of the inner dome, don't worry if it looks a mess as this part is hidden. Again research into mortar for this stage of the build points towards a high temperature proof mortar not just a standard sand and cement mix which would crack.
A lot of websites and books are based in the US and funnily enough Australia and mention various brand names of high temp mortar such as refmix and fireclay mortar which I couldn't find in the UK but I eventually found a company called Vitcas which were coincidentally based in Bristol who offer pretty much all you need to construct an oven, their outdoor oven cement fitted the bill perfectly
So this was used for all joints in the inner dome


Here we can see the staggered joints and how the bricks are touching on the inside with just a back fill of mortar at the sides and back (the bricks I used were rustic and not uniform in profile, a neater interior could be achieved with square edged engineering type clay bricks, hey ho!)

Getting to the point were the bricks started falling inward, time to stop!


The sand form
Once the dome gets to a certain height the dome gauge becomes redundant as the angle means the mortar cannot hold the bricks in place and gravity takes over. Again research turned up several ways of finishing the dome including polystyrene formers and even an exercise ball inside the oven. I chose to use a sand form as I had plenty of sand and some mdf offcuts.

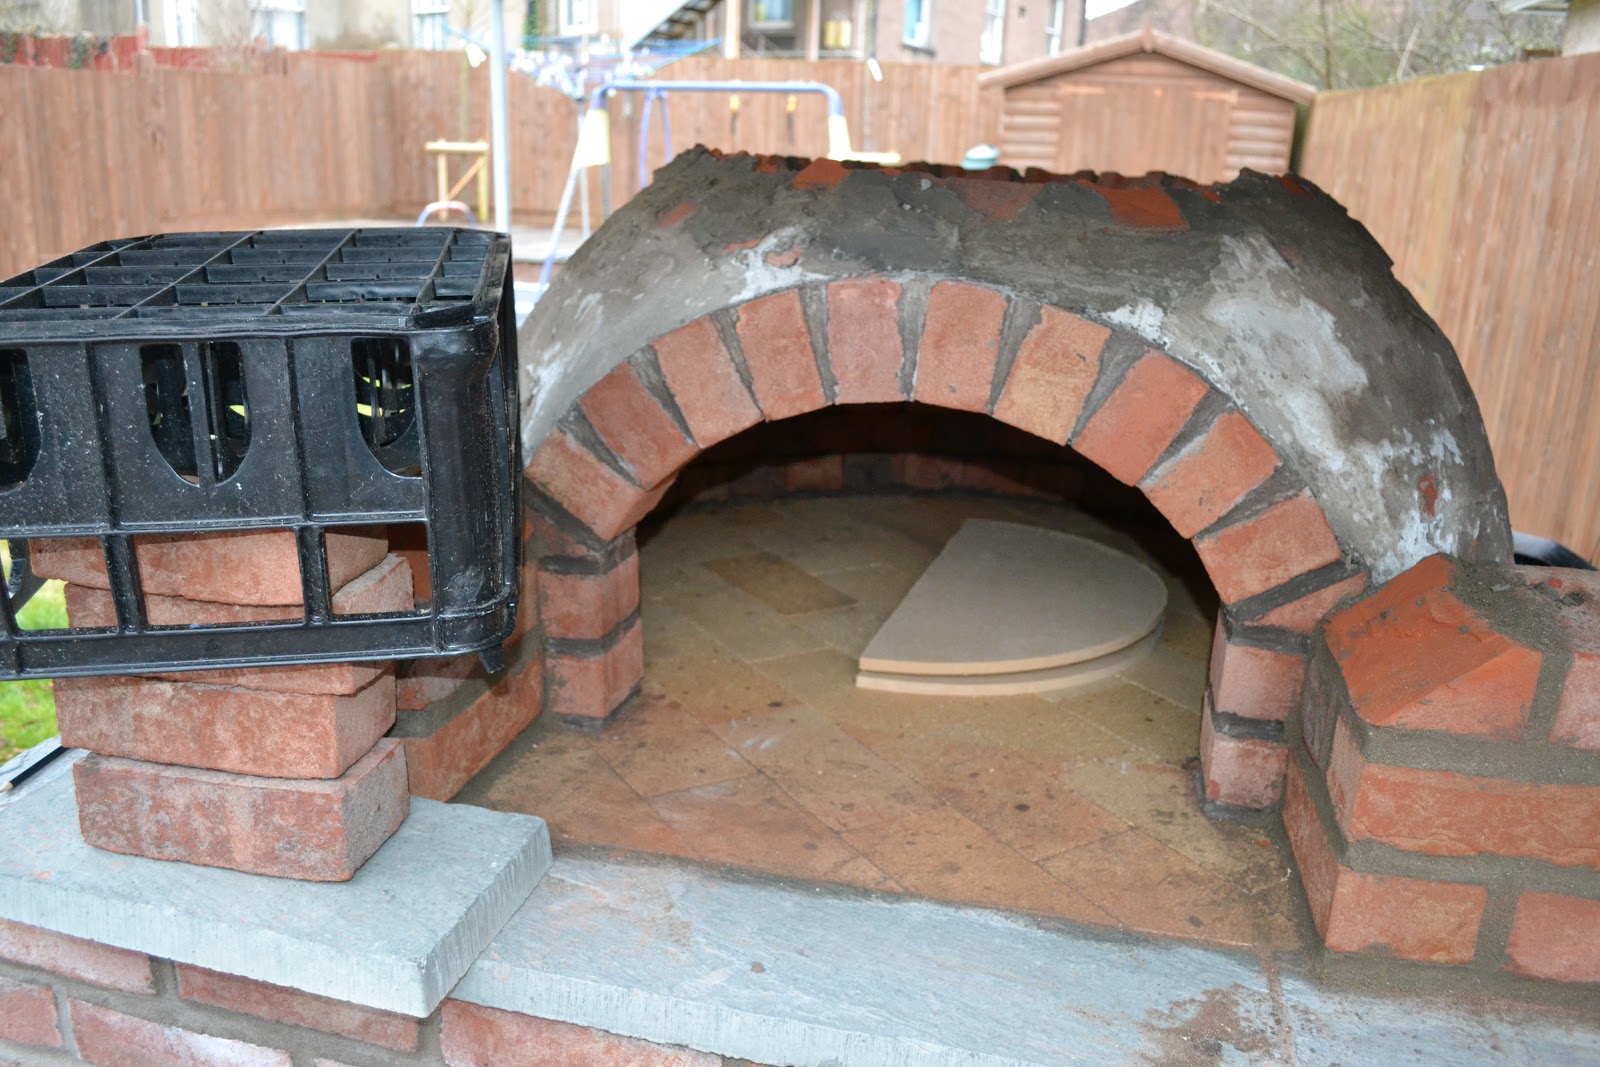


The mdf is hinged to allow it in and out of the oven, the hinges are set so that it will take the weight of the sand without folding in on itself. The whole thing is pushed up into the opening and propped with whatever was at hand.

Builders sand is then put on top and formed into the top of the dome shape.


The half and later quarter bricks are placed so they rest on the sand form with their bottom edges touching and mortar is pushed in to the gaps at the top

And that is the inner dome complete and given a thin coat of mortar to finish off.
The outer arch
Now that the inner dome is complete it was time to start the outer arch which incorporates the flue exit and frames the inner arch allowing a lip for a rudimentary door to lean against to keep any stored heat in the oven for breads and slow roasts etc.
Originally I was going to do this outer arch in brick only and then insulate and render the oven dome but after discussing it with my wife we both decided it would be nicer to clad the whole thing in brick ('like Jamie Olivers' were her words). In the end this was the right choice, it was really impatience on my part to get it finished and the thought of cutting more bricks that was swaying me towards the easier option of a render finished dome.
Because we took the brickwork finish route the outer arch needed to be built up a bit in order to tie in with the outer dome brickwork, these photos show the outer arches progress, again no plans but just building on what was already there.

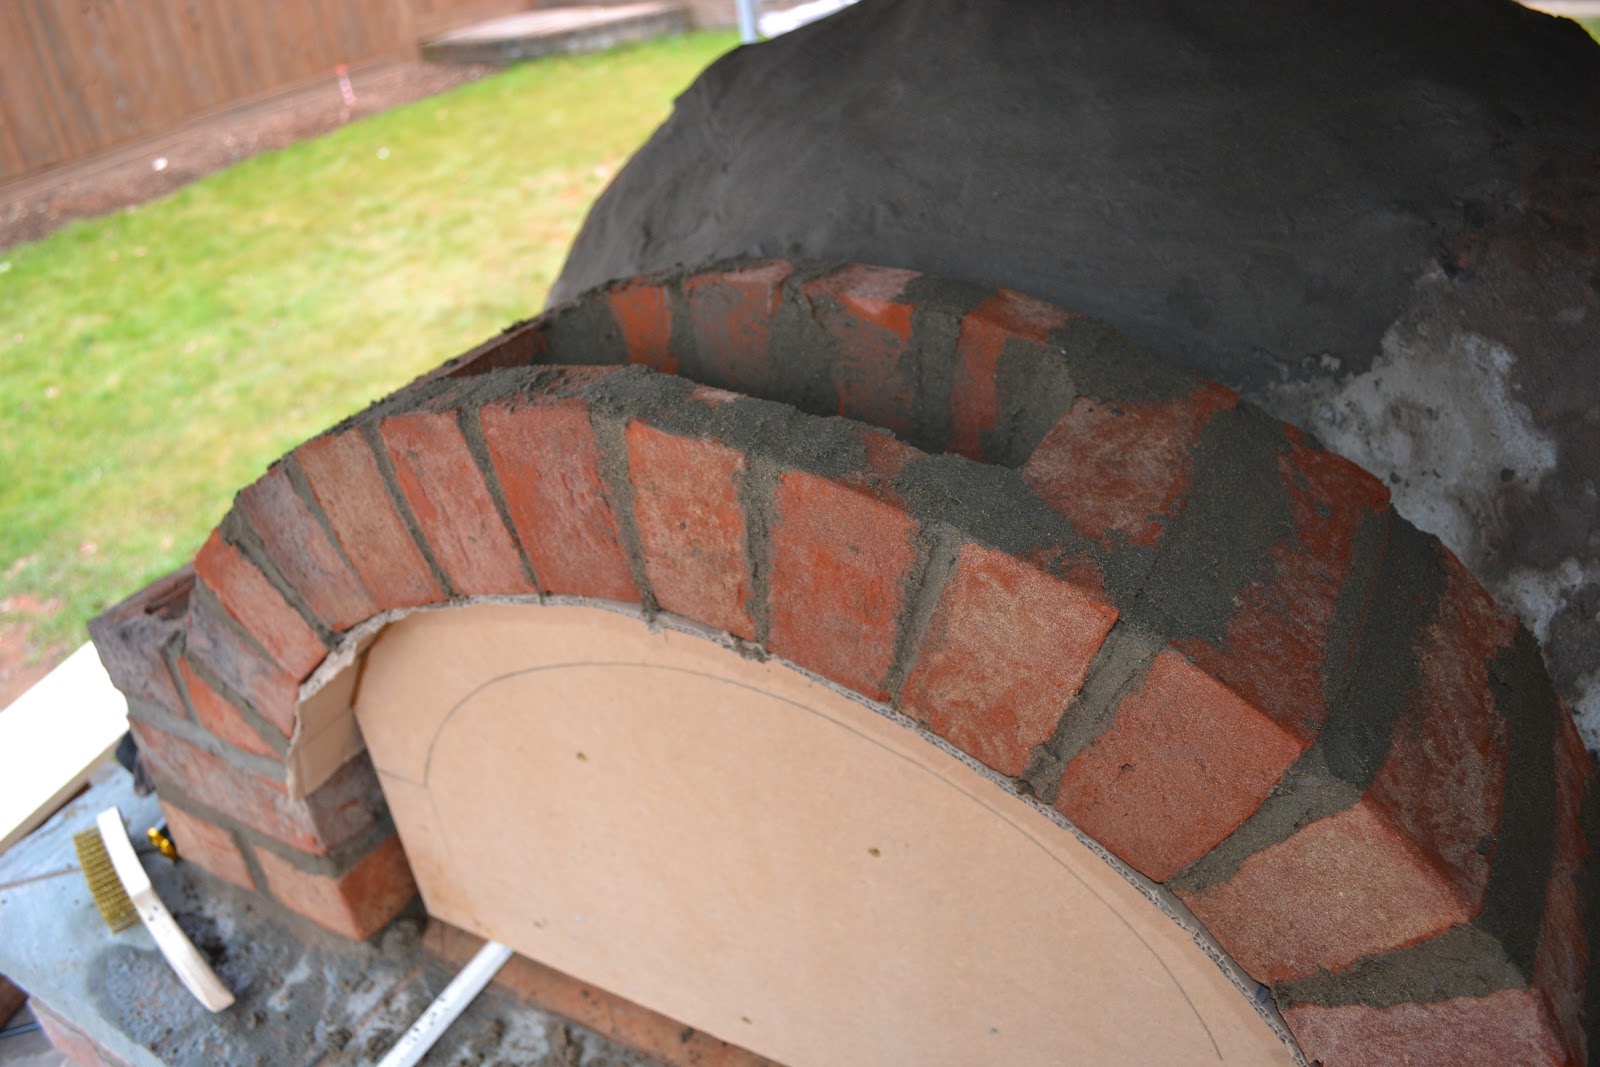
This shot shows the flue exit where the hot smoke should exit upwards


Dome insulation
Insulating the dome was the next step, research again showed that nearly all advice was not to skimp on insulation, again foreign brand names were used but for me the best solution was ceramic fibre insulation blanket developed for use on the space shuttle during re entry and now used to insulate high temperature kilns in industry. A roll was sourced and bought on ebay for a good price from a kiln supplies shop and to my good fortune two and not one rolls were delivered. never one to look a gift horse and all that this meant that the dome would have from 2 inches at the bottom to 6 inches at the top, more than enough!
When applying the blanket I heeded all the safety warnings I had read about and wore a paper suit, dust mask, gloves and goggles. I hope the neighbours weren't worried.

Outer Brick Dome
Once covered and secured with a little wire I tried to figure out how I would build the outer brick dome. By laying out the bricks around the newly insulated oven the added bulk of the ceramic blanket meant that the first three courses would be upright and then I would start to angle in.


As you can see from the first six courses, three upright and three angled in that the shape was forming. I was slightly worried about going up but by just following the angle of each half brick by eye one after another on each course seemed to do the trick and each course was staying level.

This is the first six courses pointed and dry, notice the chicken wire added to the top of the insulation

To even out the top of the insulation and form a smooth surface to place the bricks on I used about 40mm of insulating cement over the mesh. This was a mix of cement and perlite grains which had a consistency of wet porridge and was fairly easy to smooth over with a trowel, again all shaping was done by eye. Once set the final brick courses were rested on the dome top.

The outer arch needed a final build up to meet the outer dome bricks.


Onwards and upwards using half and quarter bricks

A long day that needed temporary lighting!


The flue
It feels like the build is finally coming to an end.
The way the oven works is that the burning wood is placed at the rear of the oven dome and the heat and gases rise over the curved roof and exit at the top of the arch while cooler air is drawn in at the bottom to feed the fire the hot gases are then drawn up through the gap in the outer arch into the flue and expelled at the top of the flue pipe.
Again after research and cash constraints I settled on a one metre 6 inch diameter matt black enamelled flue pipe that could be removed from the oven when not in use so a short joining section would be permanently set above the Arch.
Again there are several trains of thought with flues and chimneys (a flue being a pipe joined to but separate from any infrastructure , a chimney being part of the infrastructure, usually brick. The things you learn eh! Yawn...)
But I settled on a steel pipe rather than stainless as I prefer the matt black look rather than the chrome bling of the stainless pipe, plain steel is one quarter of the price and if it rusts throughI can replace it.
So two bricks were fettled with a small grinder joined to the top of the arch and the short joiner piece fire cemented in.
All flue pipes were bought off the shelf from machinemart http://www.machinemart.co.uk/


Interestingly enough I couldn't work out how the pipe fitted into the joiner, I had presumed that the flue would go over the joiner as it were, but again found out from a heating engineer that the opposite was true and and that flues fit inside each other from above due to any condensation and resin build up that can run freely back down the pipe. Fascinating.....
The door
As it takes time for an oven to totally dry out and cure before a series of small fires dries it out more. I thought I could fabricate a door in the meantime. I had an old metal locker tray and using the outer arch template cut out a door shape. The lip at the bottom would hold the door upright and against the recess around the inner arch.


This metal skin was then bolted to two sections of old scaffold plank and the offcuts of wood were used to make the rustic handles. I also purchased a 0-500c probe thermometer from Vitcas which fitted nicely in a hole drilled through the door to monitor air temperature inside the oven (for use when the fire is out, for bread etc).
All in all I was very pleased with the look of the door.
Curing fires

This photo shows the second in a series of seven curing fires that need to be lit to dry out the oven. each fire is slightly hotter than the previous building up to about 400c which is pizza cooking temperature. I won't bore you with the drying times of mortar and concrete but it can take months to dry out properly. Any water left in the structure with too much heat would turn to steam and lead to cracks so it is important to dry a new oven out slowly.
The first fire had been a small newspaper and small kindling affair and had been a great success with all the smoke being drawn up out of the outer arch channel even without the extra draw that a metre long flue would give.
The second fire was also going well but seeing as how the inner dome had been drying for a couple of months and this is where the main fire is held I was impatient and added some dry oak to the fire to speed things up a bit.
On the right of the picture on the shelf is an infrared thermometer that I had bought from machinemart to monitor these curing fires. It was only when I aimed it at the start of the flue channel that it was reading 280c. A lot hotter than anticipated and seeing as the flue had only been mortared a day ago and not fully dried. A hairline crack had appeared at this top joint.

Once the oven had cooled I was able to lift this top section cleanly off where the mortar had blown!

Luckily it was only this new top section that was affected and it has been duly fixed with high temperature mortar and I will have to wait another week for it to dry properly before the curing fires start again. That will teach me for being impatient.
Well thats about it so far with the build, just another couple of weeks and it should be Pizza parties at the Tullys. I will keep you informed of progress and Blog the first full Pizza cooking day hopefully with some video!
Useful media for oven builders
Throughout this build I have researched a lot to help me make the decisions about my Oven. This is a list of sites,shops and books that have helped, some more than others.
Books
'Your Brick Oven' by Russell Jeavons: A good basic book from an Aussie restauranteur with build tips and recipes.
'Build your own wood fired oven' by Alan Watt: another Aussie book, a bit more in depth than above.
'Building a wood fired oven' by Tom Jaine: More historical and with a monumental build plan, not my cup of tea but a few useful pointers
'Wood-fired oven cookbook' by Holly and David Jones: Great pictures and mouth watering recipes, I can't wait to use this!
Shops
Machine mart: for flues
Bell tools bristol: Great for grinders, discs and building tools, highly recommended,
Vitcas: All you need for oven building materials, a bit pricey but good stuff.
Matching brick company: helpful brick sourcing and block supplier
Bowland stone: very helpful for slabs
Websites
Forno Bravo: great resource for building tips and hundreds of photos of self built ovens from around the world, free PDFs well worth downloading and printing off.

Brilliant! Put us down for two...
ReplyDeleteGood information and appreciate the details. We're starting an oven in a few weeks and still trying to decide on the outer finish, the brick work looks great.
ReplyDeleteHi Dave, good luck with your build, I prefer the bricks to just plain render and it wasn't as much trouble as I thought, keep me posted on your build any details would be appreciated, size, location, type etc.
DeleteCheers, Mike.
Mike - an excellent description of your build and ideal for anyone thinking of embarking on an oven build project. I feel ashamed that I didn't get around to posting a blog for my build. I always intended to but got too involved in the build and then in baking bread. I must live fairly close to you (just outside Glastonbury) and also used Vicas for my supplies and Forno Bravo for the plans. I had never laid a brick or block in my life but had the invaluable help of a friend who has done a lot of building, although the very shallow dome frightened the hell out of him! I built mine in 2009/10 and now bake bread most weeks producing a dozen 1kg loaves for friends in the village. A semi-retired lifestyle (after redundancy) gives me the time to indulge my hobby and I love it!
ReplyDeleteYour oven looks fantastic and I am sure that it will provide many hours of pleasure. Are you intending to use it to bake bread, make pizzas, cook other dishes or all three? If you want any proven recipes, let me know.
Martin.
Hi Martin, thanks for the comments.
DeleteI am maybe looking to fire up my oven over easter for my first real woodfired cook! I am just going to try and get pizzas right and hopefully have a pizza party once the weather warms up (fingers crossed). I intend to do pizzas, slow roast meats and bread in that order and any good easy bread recipes would be appreciated. Do you have a photo of your oven/bread?
Mike
The oven might be useful to keep you warm when you are cooking over Easter! I have made pizza a couple of times but haven't developed the pizza making technique well enough to hold a pizza party despite having been threatening to do it for the last year. I have photo's and recipes - drop me an email on ofournos@gmail.com and I will send some through next week. I am indulging in another hobby this weekend - motorhoming. Have a great Easter and enjoy the cooking.
DeleteMartin.
Wow, cousin Mike, what an amazing project! Can't wait to taste your oven-baked pizzas :)
ReplyDeleteMike
ReplyDeleteWhat a brilliant blog site. Love your detailed post on how you built the oven and your first pizza party. Many thanks for taking the time to share your pizza oven build with us.
Terry
fantastic blog... thanks for sharing! i now have a summer project :)
ReplyDeleteThis is a very comprehensive post! Those who would like to build their own brick ovens must read this so that they’ll be able use a direct approach to finishing their project. If ever they’re not that DIY-ers, they can seek the help of professional furnace makers/builders so that they can have a brick oven that they’ll love.
ReplyDelete-Nohemi Tutterrow-
That is a really thorough article! People who wants to develop their particular stone ranges should read this to ensure that they’ll be able utilize a immediate method to completing the venture. When they’re not really of which DIY-ers, they could find aid from skilled central heater makers/builders in order to have a stone cooker of which they’ll really like.
ReplyDeleterebar reinforcement
Well done Mike - An amazing oven and a well explained blog. Your oven should last for thousands of years; allowing countless generations to experience the wonders of pizza.
ReplyDeletePaul M (Herefordshire)
Hi Mike,
ReplyDeleteEnjoyed reading your blog which has now spurred me on to start my own oven.
A quick query in relation to the clay bricks. I was advised to use firebricks for the inner dome. I was just wondering if you have had any crack or plake with the heat.
Regards,
Dylan
Half way through my build and found your blog, having read hundreds it is perhaps i would say the most graphically pleasing and honestly written i have found. Well done Mike you can truely feel proud
ReplyDeleteCheers
Stuart (WSM)
Very informative and great accompanying images. I will be building mine in a concrete block extension to my shed, so I will need to further research the flue aspect. Thank you once again for a great article.
ReplyDeleteStephen fb: Old Radnor Barn
Hiya, great story and very (!) good pictures. Thank you very much for sharing!! Greets, a fellow builder ;) Pieter from Brittany, France
ReplyDeleteI have spent countless hours researching my pizza oven build- If only I had found your excellent description first. Thanks so much Mike. I did build a rocket stove barrel oven that works ever so well heat up to 250c degs in 30 minutes, but want a big one for my 70th
ReplyDeleteGreat great great big thanks
Thanks Mike
ReplyDeleteA great source for inspiration
Well done, truly a beautiful job on the oven. I am just about to build my own using red bricks as you did, allow me to ask this question...has the oven cracked or is it fine? Is the brickwork still OK? Thanks
ReplyDeleteThis comment has been removed by a blog administrator.
ReplyDeleteNice Images and well explained. Thanks for Sharing Oven build ..
ReplyDeleteJust wanted to comment and say that your blog helped me build my pizza oven last year! You can check it out at http://gardengeek.net/category/pizza-oven/ if you're interested :)
ReplyDeletePrestige Brick and Block Ltd is a family run commercial and residential brick and blocks laying company in New Zealand. Specializing in brick and blocks laying work means we work with together with clients and adhere to all required safety measures and ensuring quality work.
ReplyDeleteGood
ReplyDeleteSuperb effort and well thought out plan. just one minor criticism and that is only me, I think the base is over engineered or is there a reason for this.. My thoughts are to construct a base which is a upside down open box with shelves for wood and tool storage. any help is taken on board. cheers
ReplyDeleteI like your post. It is good to see you verbalize from the heart and clarity on this important subject can be easily observed... brick pointing company NY
ReplyDeleteGood articles, Have you heard of LFDS (Le_Meridian Funding Service, Email: lfdsloans@outlook.com --WhatsApp Contact:+1-9893943740--lfdsloans@lemeridianfds.com) is as USA/UK funding service they grant me loan of $95,000.00 to launch my business and I have been paying them annually for two years now and I still have 2 years left although I enjoy working with them because they are genuine Loan lender who can give you any kind of loan.
ReplyDeleteI'm Абрам Александр a businessman who was able to revive his dying lumbering business through the help of a God sent lender known as Benjamin Lee the Loan Consultant of Le_Meridian Funding Service. Am resident at Yekaterinburg Екатеринбург. Well are you trying to start a business, settle your debt, expand your existing one, need money to purchase supplies. Have you been having problem trying to secure a Good Credit Facility, I want you to know that Le_Meridian Funding Service. Is the right place for you to resolve all your financial problem because am a living testimony and i can't just keep this to myself when others are looking for a way to be financially lifted.. I want you all to contact this God sent lender using the details as stated in other to be a partaker of this great opportunity Email: lfdsloans@lemeridianfds.com / lfdsloans@outlook.com OR WhatsApp/Text +1-989-394-3740.
ReplyDeleteOur stucco contractor New York works dedicatedly to quality. We arecommitted to excellence; provide onsite advice and recommendation for yourprojects. Call us for all types of plastering work, and peace of mind is whatwe offer.
ReplyDeleteWow, amazing blogpost and really very nicely describes about best pizza oven, I also like your way describing with interesting images. Thanks for sharing informative post. I also have reference of same website that provide portable pizza oven at the best price. Please check . https://www.ontn.in
ReplyDeleteThanks and I have a neat give: What Was The First Home Renovation Show split level renovations
ReplyDelete